概要
在開始進行 MoPub 設定之前,請務必確認您的專案中已包含以下三個檔案:
- MoPub SDK
- Vpon SDK
- Vpon MoPub Custom Event
Note:
原生廣告串接設定
如果您選擇透過 MoPub 串接 Vpon 原生廣告,請務必按照以下範例實作以成功展示廣告。
以下方式適用於 Vpon MoPub Custom Event v1.3.0 及以上版本
設置原生廣告 Layout
請使用 VponViewBinder 及 VponNativeAdRenderer 建立原生廣告 Layout。
...
moPubNative = new MoPubNative(this, MY_NATIVE_UNIT_ID, moPubNativeNetworkListener);
VponViewBinder vponViewBinder = new VponViewBinder.Builder(R.layout.mopub_native_layout)
        .mainImageId(R.id.native_main_image)
        .iconImageId(R.id.native_icon_image)
        .titleId(R.id.native_title)
        .textId(R.id.native_text)
        .callToActionId(R.id.native_cta)
        .privacyInformationIconImageId(R.id.native_privacy_information_icon_image)
        .build();

VponNativeAdRenderer vponNativeAdRenderer = new VponNativeAdRenderer(vponViewBinder);
moPubNative.registerAdRenderer(vponNativeAdRenderer);
moPubNative.makeRequest();
...
Note: 如果您使用的
Vpon MoPub Custom Event 版本為 v1.1.0 或以下版本,則使用 MoPub 的ViewBinder及MoPubStaticNativeAdRendererMethod 即可
使用 VponMediaView 展示廣告素材
使用 VponMediaView 取代原本的 ImageView,以展示更多元化的廣告素材。
<?xml version="1.0" encoding="utf-8"?>
<RelativeLayout xmlns:android="http://schemas.android.com/apk/res/android"
    xmlns:tools="http://schemas.android.com/tools"
    android:id="@+id/native_outer_view"
    android:layout_width="match_parent"
    android:layout_height="wrap_content"
    android:background="@android:color/white"
    android:textDirection="locale">
...

    <com.vpon.ads.VponMediaView
        android:id="@+id/native_main_image"
        android:layout_width="match_parent"
        android:layout_height="200dp"
        android:layout_alignParentLeft="true"
        android:layout_alignParentStart="true"
        android:layout_below="@+id/native_text"
        android:layout_marginLeft="10dp"
        android:layout_marginRight="10dp"
        android:layout_marginTop="10dp"
        android:background="@null"
        android:contentDescription="native_main_image"
        android:scaleType="fitCenter" />
...
MoPub 後台設定
Mopub 後台設定請參考下列步驟:
Step1: 新增 app
選擇 Inventory 選項並點擊 “Add a New App” 新增您的 app。

Step2: 新增廣告
進入剛註冊的 app 後點選 “Add an Ad Unit” 並選擇要新增的廣告類型。

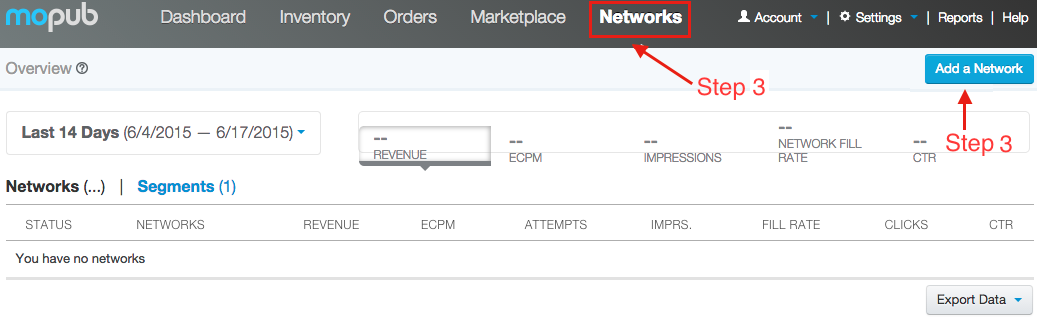
Step3: 新增 Vpon Ad Netword
選擇 “Networks” 選項並點擊 “add a Network”。
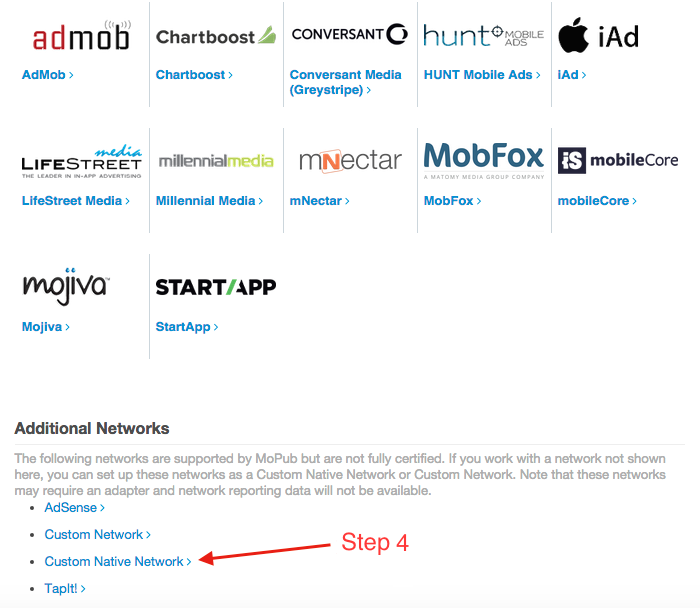
Step4: Custom Native Network
選擇 Custom Native Network
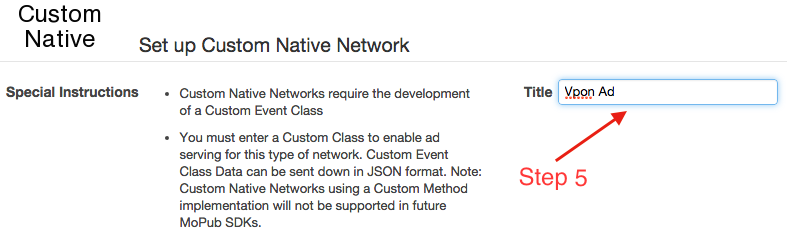
Step5: 填入標題名稱
填入辨識用的標題名稱, 方便您管理增加的 Ad network
Step6: 填寫 CUSTOMEVENT
填入您的 package name + class name, 可以參考範例所示
Step7: License Key / adUnitID
填入您在 Vpon 申請的 License Key, key 為 adUnitID

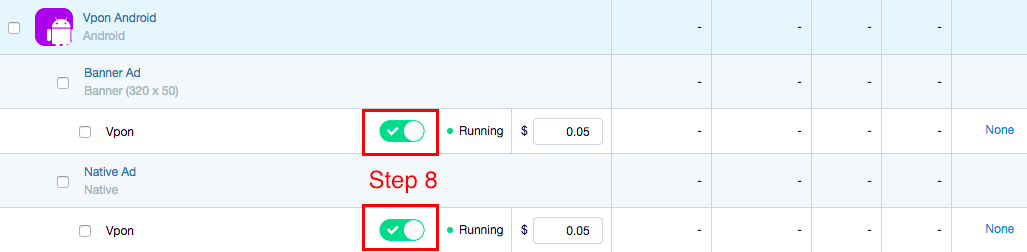
Step8: 開啟授權 Vpon Ad Network
選擇 “Segments” 選項並選擇 “Global Segment”,可以看到剛建立的 app、廣告、Vpon ad network。請開啟對 Vpon Ad Network 的授權,並確認狀態為 “Running”。